March 1, 2023
If you have ever wanted to filter a report view in Power BI using a single date parameter with conditional logic, this can be done in one of two ways that I will cover in this post. To set the stage, I am going to be looking at data regarding movie releases. The fields that we will be focused on include: Movie Title, Theatrical Release Date, and DVD Release Date. As a requirement, I want to be able to select a single date and filter all movies that had a theatrical release before the date selected and a DVD release after the date selected. This filter will give me a sense of which movies were likely in theaters at the same time.

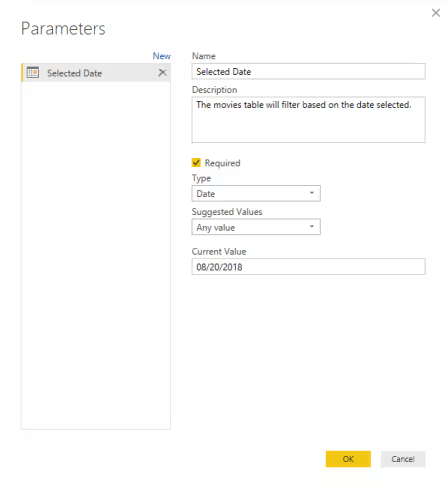
This is the more limited of the two options. We start with the table containing the three columns mentioned above. In the Power Query Editor, select Manage Parameters > New Parameter. Enter the following information as shown in the screenshot below.

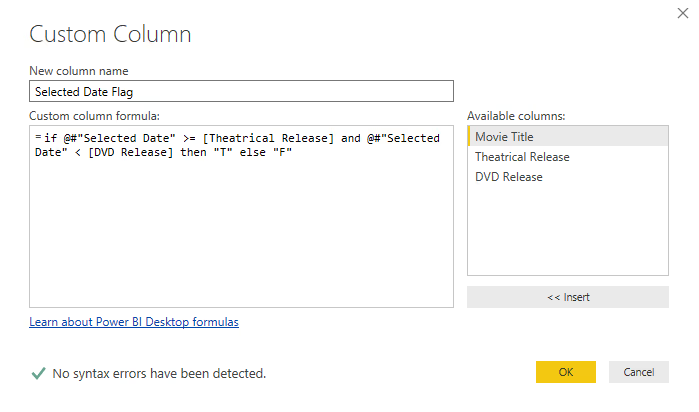
The key is to set the Type to "Date". You will notice that if you create a parameter on the report itself, there is no option for setting the type to "Date" which is why we create the parameter through Power Query. Once the parameter is created, select to add a custom column to the Movies table. Enter the formula as shown in the screenshot below. In the formula, we are taking the selected data parameter and assigning a value of True or False based on our if logic.

From here we can filter to only rows that are set to True and remove the custom column. Now when you update the default value for the parameter, the rows will refresh and reflect the newly selected value. The main drawback to this approach is that it requires you to re-publish the report to the Power BI service every time you need to change the selected date. If you are only working out of Power BI Desktop, this is less of a concern.
Although option 1 provides a solution to this problem, there is still a better way using DAX. By using this solution, you only need to publish the report once and then the selected date can be changed within the report on the Power BI service.
In order to use this solution we will first need to create a calendar table. We can do this by selecting "New Table" on the Modeling tab of the report. Then pasting in the following DAX.
Calendar =
VAR BaseCalendar =
CALENDAR ( DATE ( 2000, 1, 1 ), DATE ( 2030, 12, 31 ) )
VAR RenamedCalendar =
SELECTCOLUMNS ( BaseCalendar, "Calendar[Date]", [Date] )
VAR Calendar_1 =
SELECTCOLUMNS (
RenamedCalendar,
"Date", 'Calendar'[Date],
"Year", YEAR ( Calendar[Date] ),
"Month Number", MONTH ( Calendar[Date] ),
"Month", FORMAT ( Calendar[Date], "mmmm" ),
"Week", WEEKNUM('Calendar'[Date])
)
VAR Calendar_2 =
ADDCOLUMNS ( Calendar_1, "Year Month Number", [Year] * 12 [Month Number] - 1 )
RETURN
Calendar_2
Once the calendar table has been created, select to create a new measure. The measure will be called "Selected Date". The formula for selected date is as follows:
Selected Date = CALCULATE ( MAX ( 'Calendar'[Date] ), ALLSELECTED ( 'Calendar' ) )
Next we need to create a measure out of each date field in the Movies table.
Theatrical Release Date = MIN('Movies'[Theatrical Release])
DVD Release Date = MIN('Movies'[DVD Release])
Once those measures have been created, one more measure will need to be created to handle the conditional logic.
Conditional Date = IF([Theatrical Release Date]
&& [DVD Release Date] > [Selected Date]
,"T", "F")
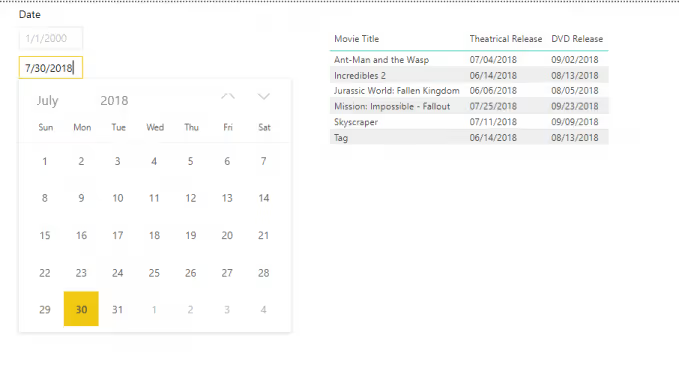
Now the all the measures are in place, we can start adding the visuals to the canvas. We will first add a slicer and set the field to "Date" from the Calendar table. The slider type should be set to "Before". Then on the slider format, select to turn off slider. Now select the table visual. Add the Movie Title, Theatrical Release, and DVD Release values to the table. In the Visual level filters, add the Conditional Date. Set the Conditional Date filter value to True.

There is now a single date picker that will dynamically filter the table based on the date selected. As I mentioned previously, this approach is much better if you are publishing to the Power BI service compared to the first option since updating the filter is more direct and intuitive. If you have any questions or comments, please reach out to me on Twitter.
