
March 1, 2023
Environment configuration management practices usually incorporates the well establish practice of build once and deploy the same version to multiple environments. In the .NET web world of compiled assemblies this means compiling once and tokenizing the config files to use with a tool like Web Deploy and Web Config Parameterization. This provides release and deployment tools a good method for replacing the tokens with the specific environment values.
In modern JavaScript frameworks like Angular, the concept of "build" is different and the fact that the files are downloaded and used on the client machines poses some unique challenges when it comes to managing environment configurations. There are a number of techniques and tools I found. I have bascially grouped into 3 categories
1. Build for each environment - execute Gulp/Grunt/Webpack/NPM script to replace and create dist folder for each target environment.
2. Have app figure what environment it is in and use appropriate settings.
3. Have token in the files and replace during deployment.
In my scenario, I have an Angular 2 app communicating with a Web Api service. Most of the secure environment configuration settings are stored in the Web Api project, however I still need to know what URL to use to call the Web Api endpoint. I used Gulp as the task runner because I can get consistent results in Visual Studio and when running it on the build server. I used Webpack to handle the JavaScript "build" process.
Goals I wanted to accomplish are
1. Keep local development working meaning if I'm trying to run local, I can't have the token for the localhost setting.
2. Build once. I want to only run the Gulp/Webpack build process once so I can ensure it is the same source in test as in production.
3. Have an easy way for VSTS Release Management to update the target environment
4. Need something that works with TFS 2015 Update 3 to deploy to an Azure App Service Web App. TFS 2015 doesn't have all of the options that VSTS currently does.
I have broken this out into 3 posts where I will highlight the key aspects of the solution. I plan to do this Netflix style so there shouldn't be any delay in following all three posts.
Part I - Overview and Local Configuration
Part II - VSTS Build Configuration
Part III - VSTS Release Configuration
The solution ended up being a hybrid of options 1 and 3. I need to use #1 to switch between local dev mode and build/release mode. For specifying the environment configuration in the release process, it is using a token that follows #3.

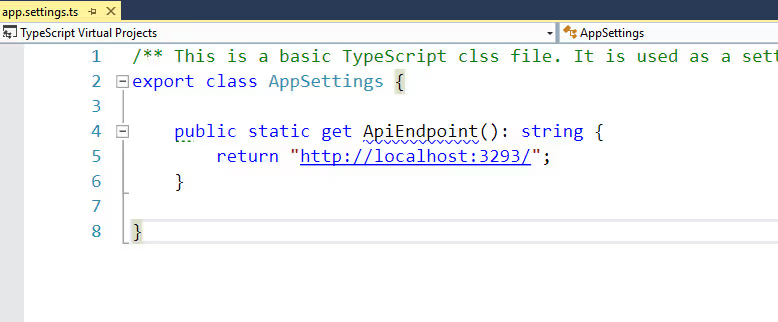
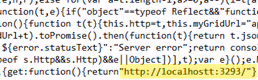
The code in this class is never called directly because the Gulp task runner uses Webpack to do the build process. This web server ready files are created in the dist folder is where the developer can debug the JavaScript code. This allows us to tokenize the file in the source TypeScript file. Below, I used three underscores for the start and end token placeholders. I originally had two but the Webpack adds a number of tokens that use two and caused the Tokenizer build task to take a long time to complete. I cover this in more detail in Part III.

The Gulp task runner file is used to do two primary functions, linting during development and call Webpack to do the building. Three packages were added for this tokenization solution.
Get--gulp-args is the first package used. This package allows the arguments to be passed in and used in the task. In this case I pass in dev or release to trigger the appropriate logic. I will discuss this in more detail later in the article. The Webpack config files allow us to either load dev for local development or the release configuration to use in VSTS Release Management.
var args = require('get-gulp-args')();
var webpackDevConfig = require("./webpack.config.dev.js");
var webpackReleaseConfig = require("./webpack.config.release.js");
In the build task, the first step is to check if the env argument is null or dev. If so it will use the dev settings, otherwise it will use the release one.
gulp.task("webpack:build", function (callback) {
// Get the environment from the command line
var env = args.env || 'dev';
process.stdout.write(env + '\n');
var myConfig;
if (env === 'dev') {
myConfig = Object.create(webpackDevConfig);
}
else {
myConfig = Object.create(webpackReleaseConfig);
}
// create a single instance of the compiler to allow caching
var compiler = webpack(myConfig);
Webpack is what does the build, transpiling, etc in our solution. The local dev file contains the additional string-replace-webpack-plugin plugin to handle the token replacement.
{
test: /app.settings.ts$/,
loader: StringReplacePlugin.replace({
replacements: [
{
pattern: /___apiUrl___/ig,
replacement: function (match, p1, offset, string) {
return "http://localhost:11706/";
}
}
]
})
}
plugins: [
new CleanWebpackPlugin(['./wwwroot/dist', './wwwroot/fonts', './wwwroot/assets']),
new StringReplacePlugin(),
When the build executes and writes the output files to the dist folder, the token will be replaced with the localhost URL. The developer will be able run the app from the local development machine in that folder.
This configures everything in the solution for the developer to build and run the apps locally. It also prepares everything to run on the build server that I will go through for Part II.

We're here to help you tackle what's next in your digital journey.


