March 1, 2023
In one of the projects I am working on we are using ASP.net MVC for our web front-end. I love the framework but I have never really been thrilled about validation using the DataAnnotations library. Based on the recommendation of some other people I discovered the FluentValidation library. The goal of this post is to show you how to create a very simple MVC application using FluentValidation as an alternative to DataAnnotations.
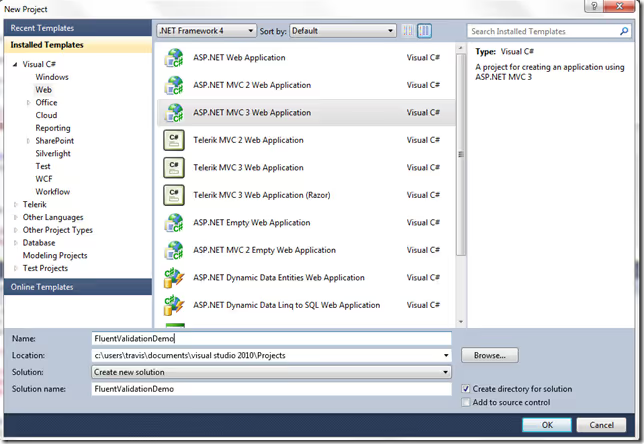
The first thing you need to do is create a new MVC Application using Visual Studio 2010:

The template you choose does not matter but for this post I am using the Internet Application template. There won’t be any authentication in the application so the Intranet template will work fine too.
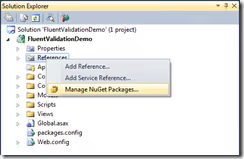
Once the project is created right-click on the References item in Solution Explorer and click Manage NuGet Packages (if you do not see this menu then make sure you download the most recent version of NuGet from NuGet.org):

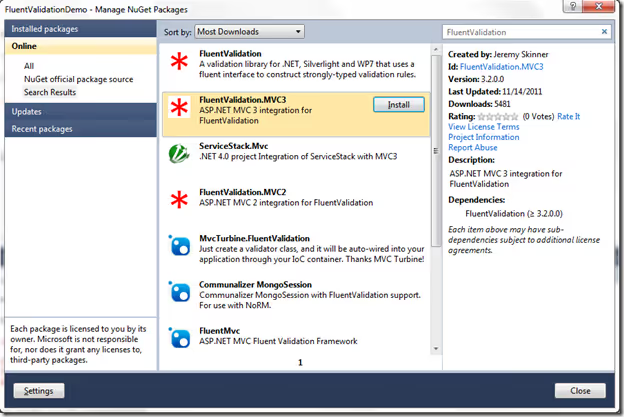
This will bring up the Package Manager dialog. In the Search box, type in FluentValidation and hit Enter. You should see a few packages in the results list. The one you want to add to the project is FluentValidation.MVC3. This will install the FluentValidation MVC3 package and FluentValidation itself (the MVC3 package depends on it). Select the FluentValidation.MVC3 package in the list and click the Install button:

Once the assemblies are added to the Solution, you can close the Package Manager and open the Global.asax file in the root directory of your project. You need to add a single line to your project to configure the framework to work with MVC. In the Application_Start method in Global.asax, add the following line:
FluentValidation.Mvc.FluentValidationModelValidatorProvider.Configure();
Once you have done this we can create a new Model class that will be used by one of our Views/Controllers:
public class RegistrationModel
{
public string Username { get; set; }
public string Password { get; set; }
public string ConfirmPassword { get; set; }
public DateTime BirthDate { get; set; }
public int NumberOfChildren { get; set; }
}
This is a simple model used to register for a website. It asks for a username, password (with confirmation), date of birth and number of children. Now that we have a model we can create the controller actions for it. We will need a GET and POST action:
[HttpGet]
public ActionResult Create()
{
return View();
}
[HttpPost]
public ActionResult Create(RegistrationModel model)
{
if(!ModelState.IsValid)
{
return View(model);
}
// register here
return RedirectToAction("Index", "Home");
}
The code here is pretty bare and more than likely identical to the code that would be used when using DataAnnotations to do the validation. If you were to run the code right now there would be no validation. Let's fix that by creating a new validator class:
public class RegistrationValidator : AbstractValidator
{
public RegistrationValidator()
{
RuleFor(model => model.Username)
.NotEmpty()
.Length(1, 256);
RuleFor(model => model.Password)
.NotEmpty()
.Length(1, 50);
RuleFor(model => model.ConfirmPassword)
.NotEmpty()
.Equal(model => model.Password);
RuleFor(model => model.DateofBirth)
.GreaterThanOrEqual(DateTime.Today.AddYears(-18));
RuleFor(model => model.NumberOfChildren)
.NotNull()
.GreaterThan(0)
.NotEqual(13);
}
}
We have defined the following rules for our model:
Now that we have our validations in place, we need to update our model to include an attribute that will wire up the validation with MVC. Add the following attribute to our RegistrationModel class:
[Validator(typeof(RegistrationModel))]
public class RegistrationModel
That is all that is needed to use FluentValidation. The same rules apply when using client side validation. You need to include jQuery, jQuery Validation and optionally include jQuery Unobtrusive Validation scripts. These steps are no different than using DataAnnotations so it's very simple to convert a site to use the framework. If you are using Dependency Injection then you can also create your own validator factory that will wire up the validators for you so you don't need to register the type of validator on each model you create. If you use Ninject, there is already a NuGet package that has a validator factory that you can use. Just open up the NuGet package manager and search for Ninject.Extensions.FluentValidation.
FluentValidation is a very powerful framework. There are plenty of built in validators that you can use such as verifying a credit card or e-mail address. Creating your own custom validators is also very simple. Head on over to the GitHub page today and look at the documentation to start using it in your projects.
